

Hi there!! *Waves*
I’m……. Back!!!
It’s been a (long!) while. School has been keeping me busy lately, and I haven’t worked on posts as much. So I guess that means I’m back from an unofficial hiatus! I hope to get more on track now after my long break.
AND, I recently got something that I am excited to show you all… 😮 …
…in another post! 😉 So stay tuned for another post soon!!
ALSO, November is here… so I am looking forward to hosting another Basket of Thankfulness activity, like last year!! Anyone remember it?
SO, today I am going to show you how to craft a replica of American Girl’s slow cooker set!
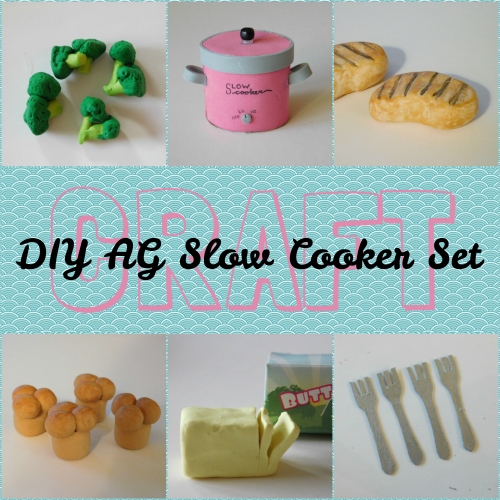
I’ve really liked this set for a while now, but it costs a pretty penny. So why not just make it instead? Enjoy!
You Will Need:
For the slow cooker:
- An empty cardboard paper towel or toilet paper roll
- Colored craft foam
- Hot glue (regular glue may work too)
- Paperboard (like cereal box cardboard)
- A pen or fine tip sharpie
- Scissors
- A bead
For the food (Chicken, Broccoli, Rolls, Butter):
- Clay (I use Sculpey Polymer clay)
- Acrylic Paint (If you have soft/chalk pastels then you can use those instead, but I don’t in this tutorial)
For the Utensils:
- Paperboard
- Scissors or a craft knife like Xacto
- Silver paint
Any pieces from the set that are missing from the materials list, I will give a short description for how to make them (or at least some ideas), but I haven’t tried it for this tutorial myself.
I also tried to label everything pretty clearly, so if you are interested in making something specific from this set, feel free to skip around!
Let’s Begin!
Slow Cooker:

First off, Cut off a portion of a paper towel/toilet paper tube for the body of your cooker. Mine is a little less than two inches tall.
[This cooker is smaller than the AG one; if you want it bigger, then you can try using paperboard (or just craft foam) to make the tube from scratch.]
I also bent it into a more oval-like shape.
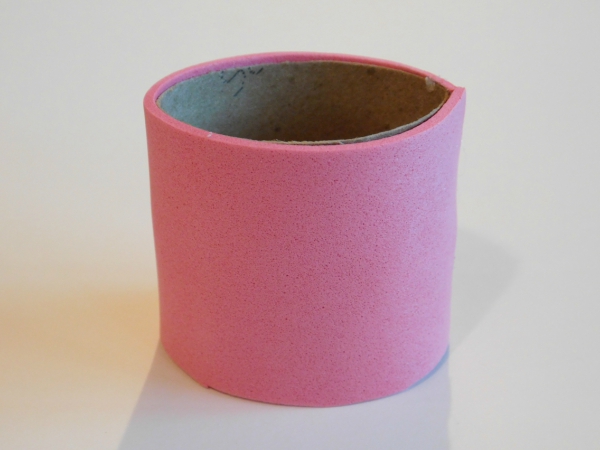
Then wrap the outside of the tube in craft foam, gluing it down as you wrap it on. I chose a pink/red color.
At this point you can also trace the bottom of your cooker onto some paperboard, cut out the oval, and glue it onto the bottom of the cooker.
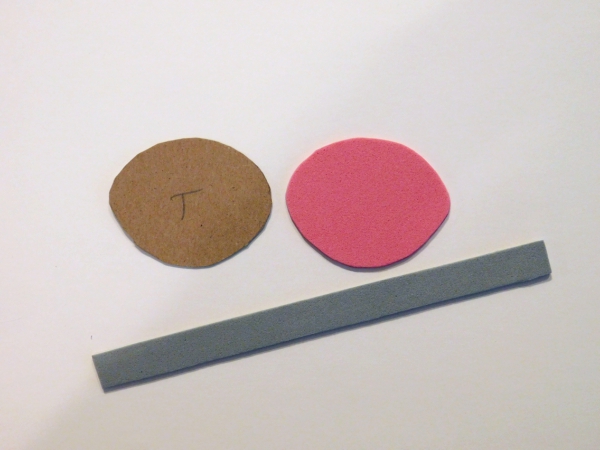
Next cut out three pieces: (1) A paperboard piece cut from tracing the top, (2) A craft foam piece from tracing the top, and (3) a skinny craft foam rectangle/strip that is long enough to wrap around your slow cooker (i.e. as long as the circumference of the cooker), for the lip of the lid. The rectangle/strip does not have to be the same color as your cooker; I made mine grey.
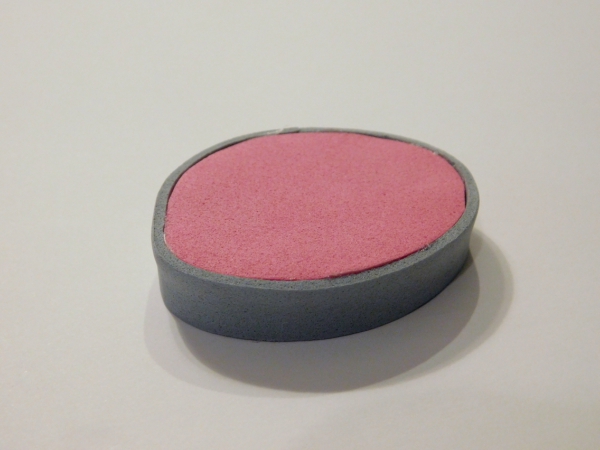
To make the lid, glue the craft foam oval to the paperboard oval, and then glue the strip all the way around those pieces.
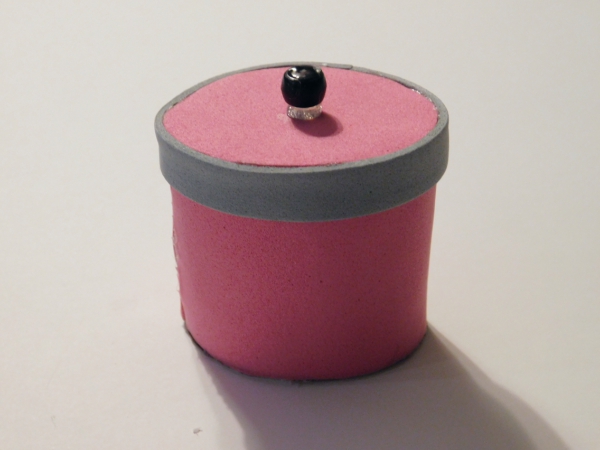
Find the center of your lid and glue on a bead for a handle. I put a little pile of hot glue onto the lid before gluing the bead on top, to make it a bit taller. Make sure the lid fits on your cooker.
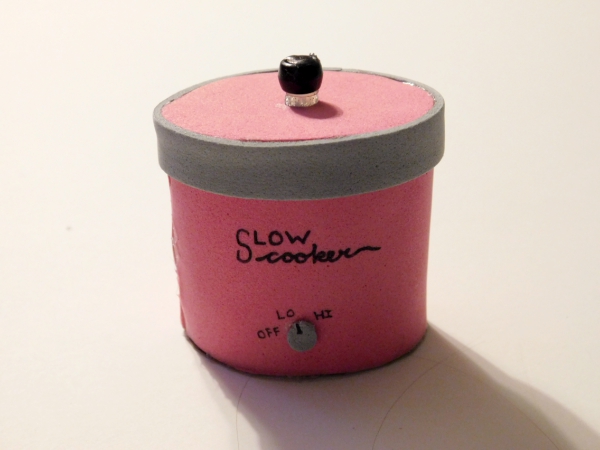
Next cut out a circle of grey craft foam (I just used a hole punch) for the temperature knob. Glue it onto the front of the cooker pot, write a little line on the knob, and write “OFF” “LO” and “HI” around the knob. I also wrote “SLOW cooker” onto the pot. You could write “crock pot” if you want that instead. [Note: for some of this writing I used a fine tip sharpie, and for some I used an extra fine prismacolor pen (like an extra fine tip sharpie). But if you just have the sharpie then that works, too.]

Next cut out two little trapezoid shapes for the handles of the cooker. mine are approximately a little over an inch long, and a fourth inch wide.
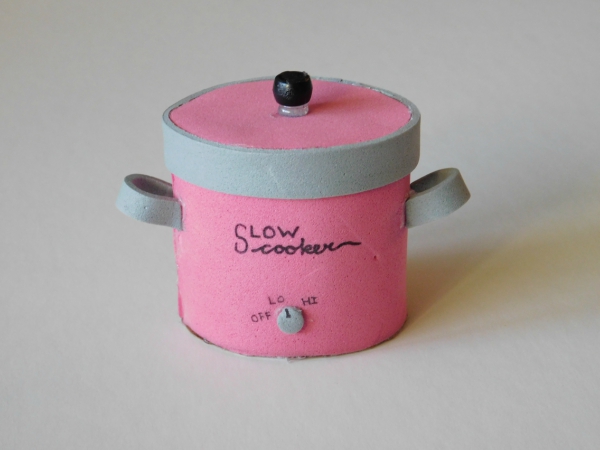
Glue each angled ends of the trapezoids to the sides of your cooker, forming one loop handle on each side. Maker sure the longer part is on bottom, and the shorter side on top. Here is your finished Slow Cooker!
Food:
Chicken:
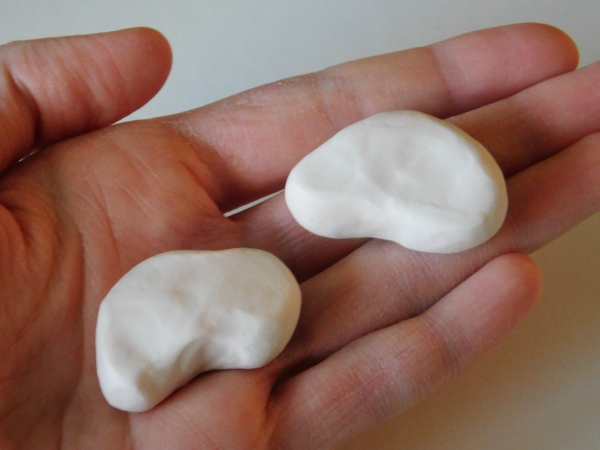
First, take some beige (light tan) colored clay and form it into… chicken-portion like shapes? Like badly shaped and flattened beans…… I think you get the point…..
Anyway…
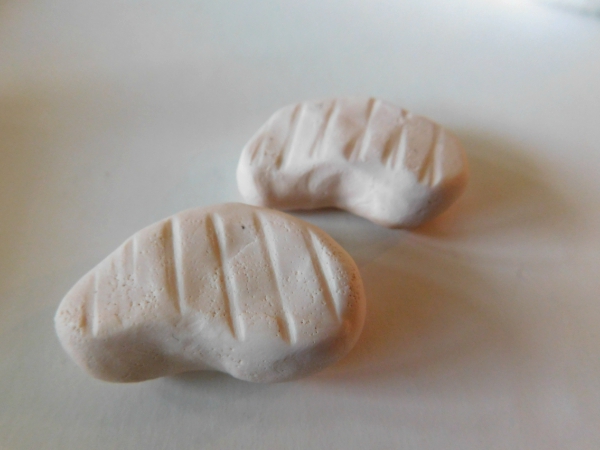
Then you can add some texture if you want using an old, thick bristled paintbrush, a clean toothbrush, or something like that. Also add the grill lines with a toothpick (or similar tool).
We’ll color it later, after it is cooked/dried! But first I made the rest of the food….
Broccoli
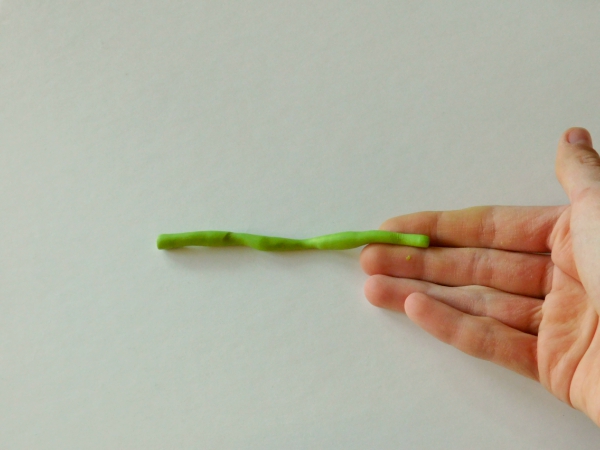
First roll out a snake of light green clay. It can be very messy and uneven, as mine is in the picture.

Then chop the snake into small pieces. These are to be the broccoli stems.

To make the tops, take pieces of a darker green clay, put a flattened ‘blob’ on a surface and add a lot of texture using a toothpick and a paintbrush/toothbrush. Then take it and wrap it around the end of one of your stems, forming it into the top of your broccoli. Repeat for each stem. [If you’d rather just stick the clay onto the stem and then texture it, that should work fine, too.] Then you can choose to leave each piece of broccoli separate, or combine some of them. I chose to combine them into sets of two broccoli ‘heads.’
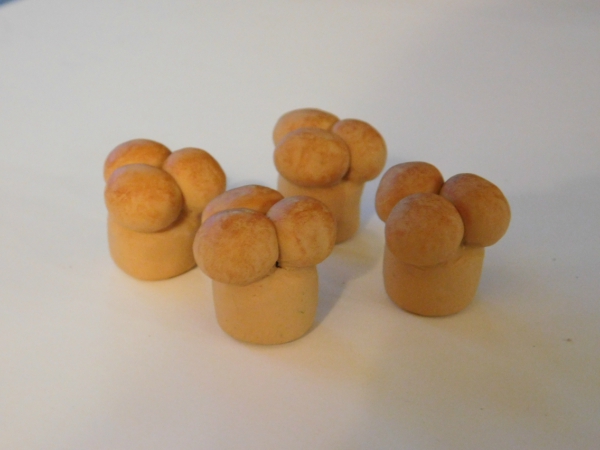
Dinner Rolls
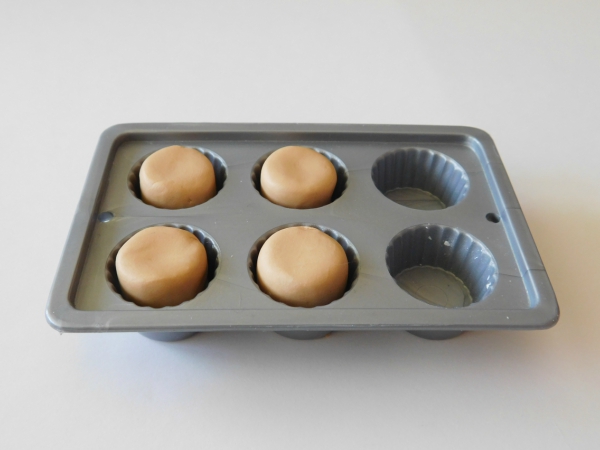
I chose to make my rolls so that they would fit into my Our Generation muffin pan!
To make them, shape beige/light tan/bread colored clay into little cylinders (can shapes) for the dinner roll base. If you want them to fit into a doll pan, then size the base accordingly.
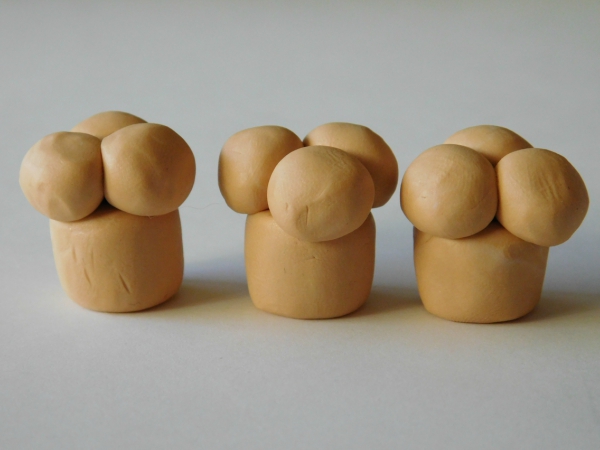
Then make three little balls for the top of each dinner roll, and stick them on top of the base.
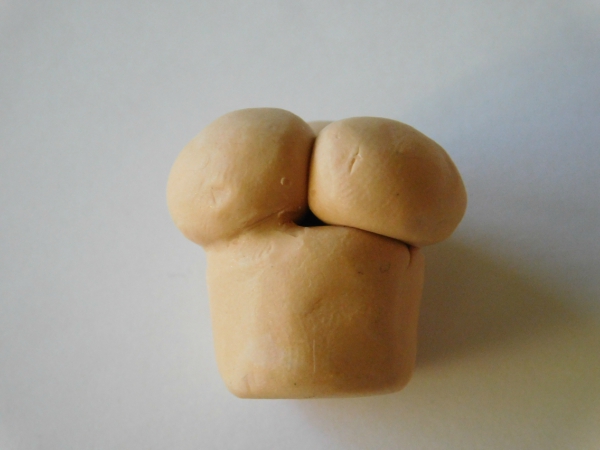
Next smooth out the lines between the top and bottom of the rolls. Here is a comparison of the smoothed part on the left and the non-smoothed part on the right.
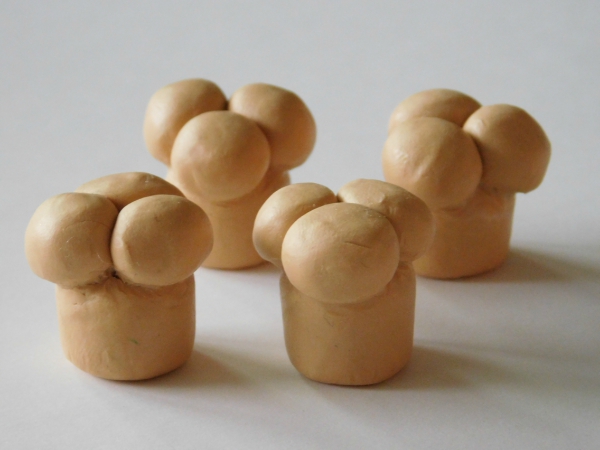
And here are all of the finished ones! (minus extra coloring later!)
I decided not to make the fruit. But if you want to make it you could do a couple of options…
- Use clay: Form yellow ball; cut it in half for each grapefruit bowl; slightly push in the flat part to make it slightly caved in for the fruit to go in/on it; dapple the outside with a toothpick to make it look like grapefruit; and add clay pieces shaped like the fruit pieces in/on the bowl.)
- Use beads: Beads can make great fruit (especially berries). For the bowl to hold it you can either make one out of clay, or you can use something else (such as a vitamin bottle cap or doll bowl. Perhaps you could even use the plastic container you get from gumball-prize machines or the round part of a small Easter egg.
Butter
If you want to make the butter case that is in the AG set, you could use paperboard for the tray.
However I’m not completely sure how you would make the glass top, but here are a few ideas… 1) finding some clear plastic packaging shaped like the top (perhaps from a pen case or small toy?); 2) use transparent polymer clay. I haven’t tried, so I don’t know how clear it would turn out; 3) lastly you could make the top non-clear using paper or clay.
Onto the actual butter! This is a pretty straightforward thing to make…
Take some pale yellowish clay and form it into a 3-dimensional rectangle/box. Make sure it will fit if you have a container for it, with some room for butter slices on the end. I chose to make my butter to fit in my Our Generation butter box.
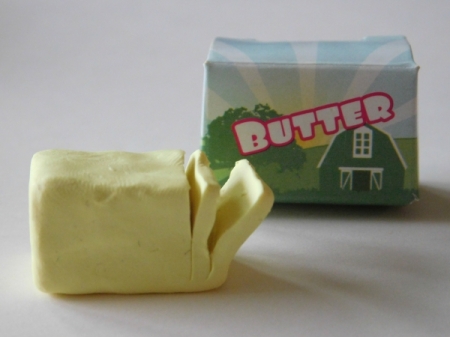
Next take a sharp knife or other cutting tool (I literally used the plastic string from a “squirmles” toy to cut this! XD It worked amazing! ) and make a little slice or two at the end of your stick of butter. Bend the slices out a bit, but leave them connected to the whole stick.
And that’s it!
Now you can cook or let dry all of your pieces, and we’ll move on to coloring the Chicken and the Rolls!
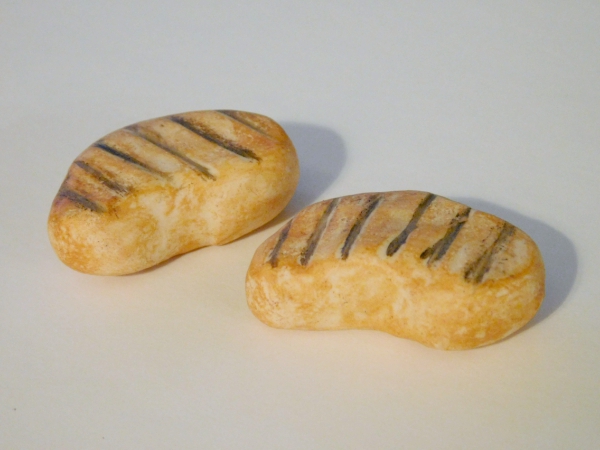
For the chicken, take some brown-ish colored paint (I mixed my yellow ochre and burnt sienna colors) and get some onto your brush. Paint it out on a (paintable) surface until the brush is mostly dry, and then dry-brush the paint onto your chicken. I used a mix of dry-brushing, and even wiping off paint with a damp paper towel to get the look I wanted.
Then take a darker brown color and paint over the indents (grill lines) on your chicken. Wait… why are there grill lines on crock pot chicken??? Oh well, it looks nice!
For the dinner rolls, just dry-brush a brown color onto the top parts. I used burnt sienna. (make sure the brown you use isn’t too dark, making your rolls look burnt instead of nicely baked)
And your food is done!
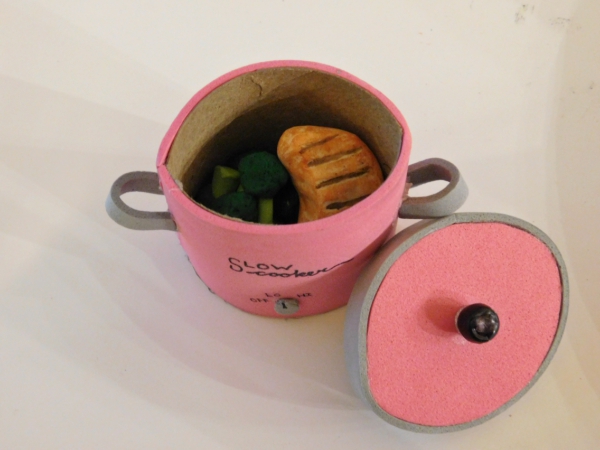
One fun thing about this set, is it all fits in the crockpot! (I’m not sure if the rolls fit, but they bake in the oven anyway)
Utensils
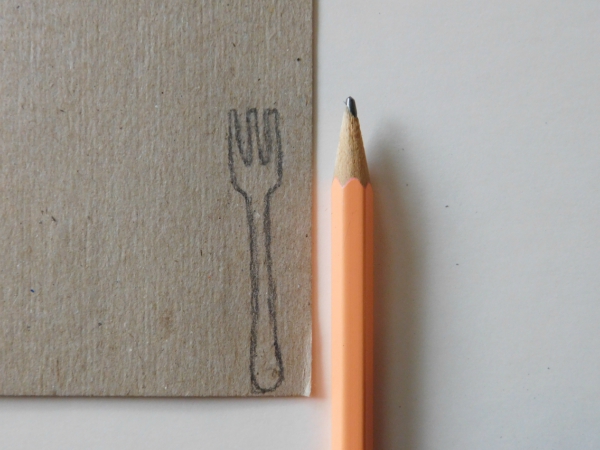
First off, draw onto some paperboard a simple fork outline, or few…
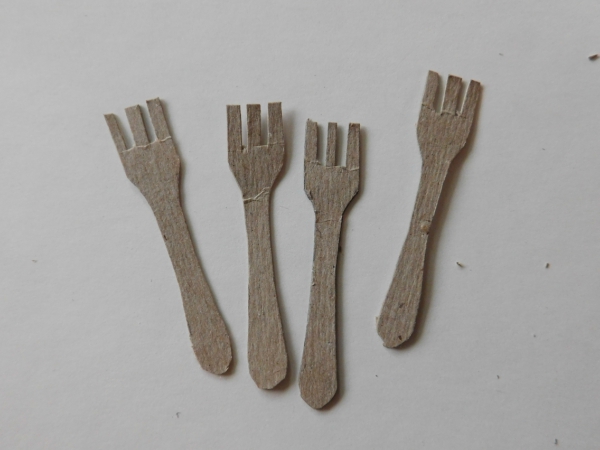
and cut them out. (I cut out one fork and traced it to cut the rest.)
I didn’t make the knife or the tongs, but here is how you can…
Draw out a simple knife shape (or few) and cut those out. (Pretty self-explanatory)
For the tongs, draw out a long strip. Make the ends a little wider and rounder than the rest of the strip. Cut it out and use a skewer, or other thin rounded object to bend the tongs in half. You can add a little glue on the fold/curve if it won’t stay bent. You may also bend the ends in a tad, if you want.
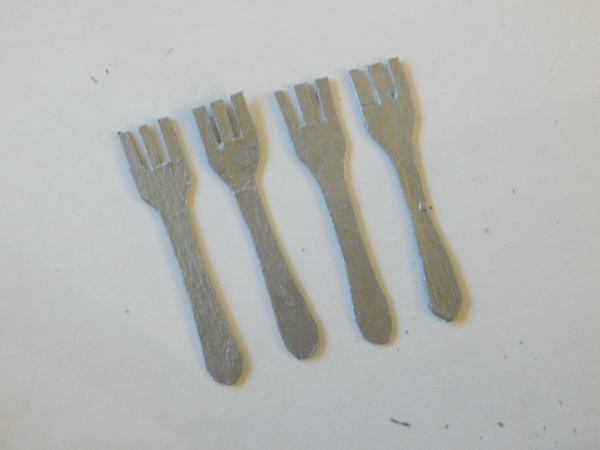
To finish, paint your utensils silver. You may want a few coats. Also, If you want to, you can paint the knife handle a different color than the blade, like AG’s butter knife, to make the two ends differ from each other.
(Feel free to seal the utensils with mod podge if you want)
And that is it!
Here are a few things that I didn’t recreate from this set, and some ideas on how you could make them.
Plates: You could use the flat lid part of canning jars for the large plates, and this tutorial for the small ones.
Milk: You can use little plastic shot cups, or I’ve taken home the little disposable communion cups from church before. And then you can paint the inside of the cups white to make it look like it’s filled with milk, or you could fill the cup with white paint or puffy paint and let dry (Note: it might take a while to dry!)
Napkins and Potholder: Use some fabric for the napkins (you can use normal fabric and hem the edges, use felt, or cut from a human napkin.). And you can also use fabric for the pot holder (if you want the edge you can hold, cut a longer rectangle of fabric, fold over some, and sew. You can sew on the little corner loop, too! Feel free to add extra layers of fabric or felt to give it more of an insulated potholder feel.)
Barbecue Sauce: I don’t know exactly how to find a tiny bottle like that, but perhaps an extract container or sprinkle container? You could also try making it out of clay.
And we’re finished!!
I hope that you enjoyed this tutorial!!
Are you going to make anything from this tutorial? Do you like AG’s Slow Cooker Set?
Is anyone here doing Nanowrimo? I’m doing it for my first time! (I’ve done camp this past summer, but not the real Nano)
Also feel free to comment if you need clarification on any of my instructions! 😉
I should be posting again soon with the Basket of Thankfulness activity! … and after that my surprise find… 😉 😉
Have a blessed day!!

I am doing Nano! How’s it going for you?
This was so cute! I might have to make this myself – and I’m not a crafty person XD
LikeLiked by 2 people
Sweet! I’m really behind (2,346 words, eek! 🙂 ), but still enjoying it! How about you?
Thank you! I hope you have fun if you make it! 😀
~Gracie
LikeLiked by 2 people
I’m like, 6k behind because I’m attempting a 50k. LOL.
LikeLiked by 2 people
I’m going for 50,000, too! I guess we’re behind together! I hope you make it, and good luck!
In fact, I’m going to go work on it now…
LikeLiked by 2 people
I love these ideas, they are all super cute and look like fun!
LikeLike
Thank you, Hannah!
LikeLiked by 1 person
This looks really cool! I think I am going to make it. If I have the right colors of clay…
Anyway, you did an awesome job on this post! Will you check out this blog called rockingwblog.wordpress.com
~Kaylyn
LikeLike
Thanks so much! I hope you can! Sure!
~Gracie
LikeLiked by 1 person
You’re welcome!
~Kaylyn
LikeLike
OOOH, a surprise!!!! I can’t wait!!!! 😃😃😃
LikeLiked by 1 person
Yay!!! 😀 😀
LikeLiked by 1 person
Yes! I am SO making this! Thanks so much for the tutorial. 😀 I can’t wait for the Basket of Thankfulness and the surprise find!
LikeLiked by 1 person
Glad to hear it, thanks so much and have fun! Yay!! I look forward to posting them!
~Gracie
LikeLiked by 1 person
Oh wow! These look amazing, I can’t wait to make them!
LikeLiked by 1 person
Thank you, Kaitlyn! Yay, have fun!
~Gracie
LikeLiked by 1 person
Aw, super cute!! Great idea!!
LikeLiked by 1 person
Thanks, Gracie!
LikeLiked by 1 person
I rebloged this on my blog! This is such a great idea! Will you check it out??
~Kaylyn
LikeLike
Aww, thank you so much, Kaylyn! Certainly!
~Gracie
LikeLiked by 1 person
You’re welcome! Great!
~Kaylyn
LikeLike
Omigosh this is so cute! I definitely HAVE to make this. Yay! Basketful Of Thankfulness, I did that last year! I am excited to do it again! 😀
LikeLiked by 1 person
Thank you!! I’m glad you’re excited!! I’m excited to do it again, too!
LikeLiked by 1 person
Yep!
LikeLike
this is so cute, and makes me wish I was tiny
LikeLiked by 1 person
Thank you ☺
LikeLiked by 1 person
YAY! Awesome! I probably won’t make it because my sister has this set already, but you did a great job crafting this!
-Jewel
http://www.dollnotebook.com/blogs/
LikeLiked by 1 person
Thank you, Jewel!
~Gracie
LikeLike
This looks very cool! I might try making the broccoli or the chicken.
LikeLiked by 1 person
Thanks, Evy! Have fun if you do!
~Gracie
LikeLike
That is such a cute craft! It turned out great!
LikeLiked by 1 person
Thank you!
LikeLike
WOW, these crafts were so great, Gracie! Everything looks great, but I especially like the slow cooker, chicken, and bread. 🙂 I’ll have to show this to my little sister because she loves make AG things!
Also, I’m juuuust about finished with your custom art! I was wondering if you’d like me to color the background (like with blue to match Callie’s eyes or maybe your favorite color) or just leave it white.
LikeLiked by 1 person
Aw, thank you! I hope she likes it!
Great, thank you! Really whatever you think would look nice. Maybe a kind of light neutral and/or pale-color, if there’s a color you think would go well, unless you think it looks better as white.
~Gracie
LikeLike
I’ll bet she will! 🙂
Okay, great! I actually decided to just go ahead and do a very light blue which I think looks good. AND I’M DONE! I’ll send you one last picture and then pack everything up! 🙂
LikeLiked by 1 person
Sounds good! Yayy! Thank you so much, it turned out amazing!! 😀
~Gracie
LikeLike
You’re so welcome! I’m putting together the package right now! 😀
LikeLiked by 1 person
hi!
LikeLiked by 1 person
Hi 🙂
LikeLike
glad you won the giveaway! and, what was the surprise?
LikeLiked by 1 person
Aw, thank you! Do you mean the surprise find that I plan to post on?
LikeLike
the giveaway surprise
LikeLiked by 1 person
Oh, ok! I don’t know, I haven’t received it quite yet. 🙂
~Gracie
LikeLike
How cute! I am so glad you were able to make it instead of buy it, it was beautiful! Hmmm, is the surprise you received the giveaway from Allison? Which, btw, I was thrilled to see you won! I can’t wait for the Basket of Thankfulness challenge! 😀
Oh, and on a side note, if you’d like anything in your blog ad changed for the next issue of CLM, just shoot me an email! 😀
LikeLiked by 1 person
Thank you! Me too! It’s not, but good guess! 😀 Thank you, me too!! Yes, I’m excited too; I just got it up!
Thanks! I’ll check it out; I might keep it as it is. 😀
~Gracie
LikeLiked by 1 person
aw man!
LikeLike
This is so cute! 😍
I was hoping to do NaNoWriMo but I didn’t get my plot done in time.
LikeLiked by 1 person
Thank you!
Ok! Maybe next time 🙂
~Gracie
LikeLike
SUPER cute!! I will definitely have to make this soon. I think baking extract bottles (vanilla, peppermint, almond, etc) would be the right size for BBQ sauce bottles. You and your blog are awesome!
~Natalie@TheAGSpot
https://theamericangirlspot.com
LikeLike
Thank you and Have fun!! Good idea! Aw, Thank you so much, and glory to God! ♥☺
~Gracie
LikeLike